What powers this website?
Discover how this website implements a three-layer architecture inspired by quartz, using mdx, next.js, and typescript to create a powerful markdown-powered blog system.
This is a simple next.js project, that uses markdown to render blog posts. there are multiple ways to render markdown into html, by the end of this article you will have pretty good idea on how i have setup my markdown powered website. But first the back story,
Quartz
I came across quartz, A static-site generator that uses markdown to power entire website. every page in quartz comes from markdown files. Quartz is good if you looking to host your notes/obsidian vault, but for a personal website/blog I don't think this should be used. Although there is something i liked about quartz.
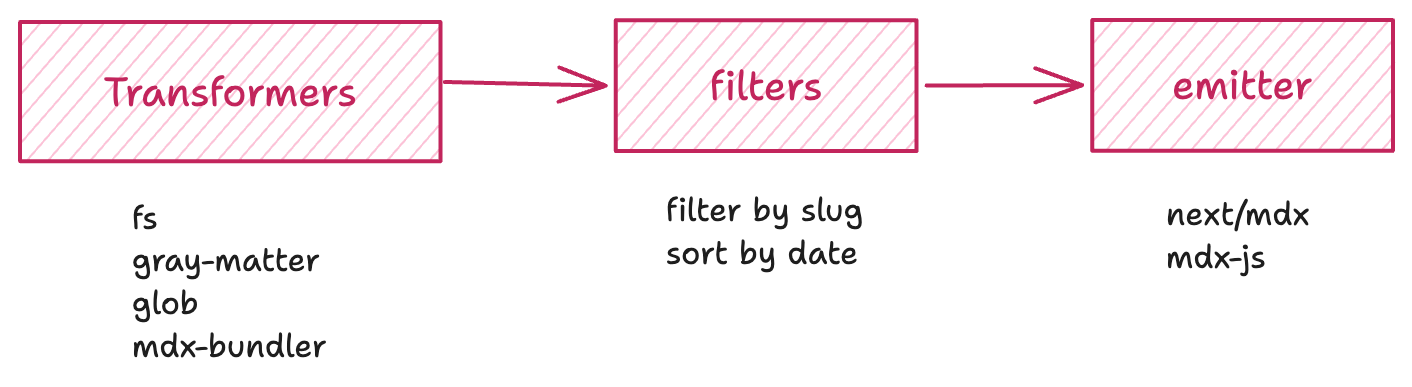
quartz have 3 layers for markdown processing,
- Transformers - read markdown files, extract frontmatter & content as html syntax tree
- Filters - Get specific files based on applied filters; like tags, title, date, status.
- Emitter - emitter renders the blog post you see on the website.
I have use similar pattern, take a look at this
I am using mdx 2 different way.
- use
page.mdxinstead ofpage.tsxto render static predefined pages. - dynamically render blogs based on directory structure.
for page.mdx we can use next.js mdx guide on how to setup @next/mdx.
for the dynamically rendering i have below setup.
1. Transformers
Transformers are the series of functions that process the markdown files to have structured data that can be rendered. In my case, i only need glob and gray-matter. glob reads files and then we pipe the files to the gray-matter and it separates metadata & content. here metadata is YAML frontmatter metadata and content is a long string that contains our markdown content.
All blog posts are grouped under content directory, this is the base directory from where we find all the files with .md or .mdx extension. glob is used to dynamically discover all blog posts in my content directory at any depth.
const getAllPostPaths = async (): Promise<string[]> => {
  return await glob("content/**/index.mdx");
};
This is how the content directory is structured. Each post or note is contained in its own subfolder with an index.mdx file inside.
content/
└── what-runs-this-website/
      └── index.mdx
now that we have all the files path (eg. content/what-runs-this-website/index.mdx), we can read all the files and pipe it to gray-matter for the transformation. we will have a slug and we store all the metadata under frontmatter property. this data can be used to render blog's listing page.
const file = await fs.promises.readFile(path.join(process.cwd(), postPath));
const { data: frontmatter } = matter(file.toString());
return {
  slug: postPath.replace("content/", "blog/").replace("/index.mdx", ""),
  frontmatter,
};
this is all preprocessing we need to do to get the metadata. now filters comes in the picture. their job is to filter content.
2. Filters
Having filter is upto the author, for me I know that I am going to only push new blogs when it's fully written so the 'published' filter does not make any difference for me, it only does when i have to unpublish a blog. For the sorting it's just descending order of the createdAt meta tag.
you can have various types of filters like,
- filter by tags - assign tags to blog and filter by those tags
- filter by categories - tech/non-tech
- filter by topics - web development/AI
3. Emitter
now on the route /blog/<handle> we get blog by the handle. example, for handle what-runs-this-website we find the directory under content that matches this handle and then we read the index.mdx
const mdxOutput = await bundleMDX({
  source: mdxSource,
  cwd: postFolder,
  mdxOptions(options) {
    return options;
  },
  esbuildOptions(options) {
    options.loader = {
      ".js": "jsx",
      ".ts": "tsx",
    };
    return options;
  },
});
return { ...mdxOutput, slug, headings: getHeadings(mdxSource) };
here
getHeadingsis a utility function to get all 'h2' headings for Table of Contents.
Sometimes we need to have a blog specific component, instead of adding it to the mdxComponent list we can just use it by importing it in the mdx file. for this setup to work we can leverage mdx-bundler and it does the heavy lifting for us.
It takes an MDX file and transforming it into executable code that can be rendered in React. The configuration includes:
- source: The raw MDX content read from a file
- cwd: The working directory (the post's folder) so imports work correctly
- mdxOptions: Configuration for MDX processing
- esbuildOptions: Configuration for the bundler (esbuild) Tells esbuild to treat
.jsfiles as JSX (because some React components might be saved with.jsextension) Points to a custom TypeScript config file
// now we have post
post = await getPost(handle);

// we can get mdxComponent that renders blog from the post
import { getMDXComponent } from "mdx-bundler/client";
const Component = getMDXComponent(post.code);

// and we can get our custom mdx components
const components = useMDXComponents({}); // your mdx-components.tsx file at /src or root directory.
now we just have to render this Component and it's done 🎉
<Component components={components} />
Lastly UI
The design of this website takes strong inspiration from nan.fyi. I came across his site after seeing his tweet about his "Build your own database" post, and I was instantly drawn in by the distinct visual style and focus on interactivity. Each blog post there has its own personality.